어우 여기까지 오는데도 너무 머네요 ㅎㅎ,,,,
일단 코드 작성하면서 설명하겠습니다.
import os
from setproctitle import setproctitle

setproctitle("")
os.environ["CUDA_VISIBLE_DEVICES"] = ""
항상 하는 이름과 GPU 설정하기
COLAB = False
from IPython import get_ipython # type: ignore
ipython = get_ipython(); assert ipython is not None
ipython.run_line_magic("load_ext", "autoreload")
ipython.run_line_magic("autoreload", "2")
이것도 없애도 되는 것 같은데....
다음번엔 지워볼게요
import torch
from tqdm import tqdm
import plotly.express as px
import pandas as pd

# Imports for displaying vis in Colab / notebook

torch.set_grad_enabled(False)

# For the most part I'll try to import functions and classes near where they are used
# to make it clear where they come from.

if torch.backends.mps.is_available():
    device = "mps"
else:
    device = "cuda" if torch.cuda.is_available() else "cpu"

print(f"Device: {device}")
GPU도 설정해 줍니다.
from huggingface_hub import login

# HuggingFace API 토큰으로 로그인
login('')

!huggingface-cli login --token
여기는 토큰 인증을 해서 미스트랄을 다운로드하여야 합니다.
모델은 여기서 찾아오면 됩니다.
https://transformerlensorg.github.io/TransformerLens/generated/model_properties_table.html
Model Properties Table - TransformerLens Documentation
Previous transformer_lens.utilities.devices
transformerlensorg.github.io
from sae_lens.toolkit.pretrained_saes_directory import get_pretrained_saes_directory
from sae_lens import SAE, HookedSAETransformer

model = HookedSAETransformer.from_pretrained("mistral-7b", device = device)
이제 모델을 다운받아 줍니다.
여기서 생각보다 시간이 오래 걸립니다.
sae_id = "blocks.8.hook_resid_pre"
#`cfg` 딕셔너리는 SAE와 함께 반환되며, 이는 SAE를 분석하는 데 유용한 정보를 포함할 수 있기 때문입니다 (예: 활성화 저장소 인스턴스화).
#이는 SAE의 구성 딕셔너리와 동일하지 않으며, HF(Hugging Face) 저장소에 있던 내용을 의미하며, 여기서 SAE 구성 딕셔너리를 추출할 수 있습니다.
# 또한 편의상 HF에 저장된 특징 희소성도 반환됩니다.
sae, cfg_dict, sparsity = SAE.from_pretrained(
    release = "mistral-7b-res-wg", # <- Release name
    sae_id = sae_id, # <- SAE id (not always a hook point!)
    device = device
)
SAE레이어도 지정해 줍니다.
레이어는 여기서 확인할 수 있습니다.
https://jbloomaus.github.io/SAELens/sae_table/
Supported SAEs - SAE Lens
jbloomaus.github.io
from transformer_lens.utils import test_prompt

prompt = "Apple"
answer = "earth"

# Show that the model can confidently predict the next token.
test_prompt(prompt, answer, model)
저는 Apple에 활성화되는 뉴런(feature)을 찾기 위해 모델을 일단 돌려봤습니다.
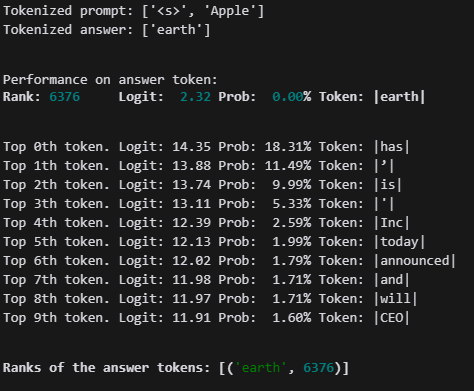
지금 earth는 무시해도 됩니다.
# hooked SAE Transformer will enable us to get the feature activations from the SAE
_, cache = model.run_with_cache_with_saes(prompt, saes=[sae])

print([(k, v.shape) for k,v in cache.items() if "sae" in k])

# note there were 11 tokens in our prompt, the residual stream dimension is 768, and the number of SAE features is 768
모델을 통해 한번 돌리면서 cache에서 파라미터정보를 빼옵니다.
tensor = cache[sae_id + '.hook_sae_acts_post'][0, -1, :]
# 평균과 표준편차 계산
mean = tensor.mean()
std = tensor.std()

scale = 10
outliers = tensor[(tensor > mean + scale * std) | (tensor < mean - scale * std)]
outlier_indices = torch.nonzero((tensor > mean + scale * std) | (tensor < mean - scale * std)).squeeze()

print(outlier_indices)

print(std)
저는 여기서 이상치를 통해 특정 뉴런을 뽑았습니다.
from functools import partial


def test_prompt_with_strength(model, sae, answer, prompt, strength_features, steering_strength, max_new_tokens=30):

    def strength_feature_hook(feature_activations, hook, feature_ids, steering_strength=1, position=None):
        # 여러 feature_ids에 대해 각각의 steering_strength를 적용
        for i, feature_id in enumerate(feature_ids):
            strength = steering_strength[i] if isinstance(steering_strength, (list, torch.Tensor)) else steering_strength

            if position is None:
                #if torch.sum(feature_activations[:, :, feature_id]).item() != 0:
                #    print(feature_activations[:, :, feature_id])
                #feature_activations[:, :, feature_id] = feature_activations[:, :, feature_id] * strength + 2 * strength
                feature_activations[:, :, feature_id] += 0.3 * strength
                #if torch.sum(feature_activations[:, :, feature_id]).item() != 0:
                #    print(feature_activations[:, :, feature_id])
            else:
                feature_activations[:, position, feature_id] *= strength

        return feature_activations

    ablation_hook = partial(strength_feature_hook, feature_ids = strength_features, steering_strength = steering_strength)
    model.add_sae(sae)

    hook_point = sae.cfg.hook_name + '.hook_sae_acts_post'
    model.add_hook(hook_point, ablation_hook, "fwd")

    #test_prompt(prompt, answer, model)
    input_ids = model.to_tokens(prompt, prepend_bos=sae.cfg.prepend_bos)
    output = model.generate(
        input_ids,
        max_new_tokens=max_new_tokens,
        temperature=0,
        top_p=0.9,
        stop_at_eos=False,
        prepend_bos=sae.cfg.prepend_bos,
    )
    test_prompt(prompt, answer, model)

    model.reset_hooks()
    model.reset_saes()

    return model.tokenizer.decode(output[0])


steering_features = outlier_indices
prompt = "The Galaxy series was made by "
answer = "Apple"
test_prompt(prompt, answer, model)
for i in range(0, 8):
    print(f"\n\n--------------------------------------\nSteering strength: {i}")
    steered_text = test_prompt_with_strength(model, sae, answer, prompt, steering_features, steering_strength=i)
    print(f"Steered text with strength {i}:")
    print(steered_text)
이제 이상치를 점점 강화시켜 나가면서 출력을 확인하면 됩니다.
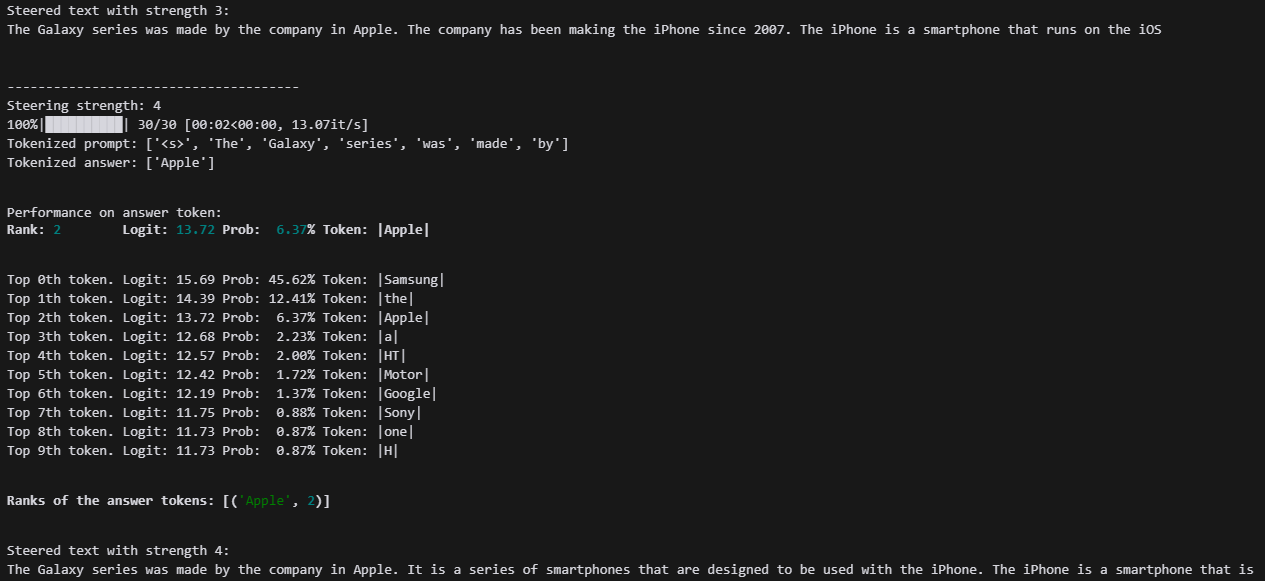
Apple라는 브랜드를 점점 많이 말하기 시작하는 것을 보실 수 있습니다.
이제 여러 모델을 통해 새로 SAE를 제작하고, 다른 실험을 진행해 보겠습니다.
'인공지능 > 자연어 처리' 카테고리의 다른 글
| LLama3 학습 데이터 변환하여 LLama3.2 Sparse Autoencoder 학습하기 (2) | 2024.09.27 |
|---|---|
| SAE Tutorial summarize (3) | 2024.09.24 |
| SAE tutorial - logits lens with features (5) | 2024.09.23 |
| SAE tutorials - SAE basic (1) | 2024.09.22 |
| SAE 튜토리얼 진행해보기 - training SAE (1) | 2024.09.20 |