일단 BERT의 구조부터 한번 상기시키고 가겠습니다.
BERT(Bidirectional Encoder Representations from Transformers)는 Google AI에서 개발한 자연어 처리 모델로, 트랜스포머(Transformer) 아키텍처를 기반으로 합니다. BERT는 문맥을 양방향으로 이해할 수 있는 사전 훈련된 모델로, 다양한 NLP 작업에서 뛰어난 성능을 보입니다. BERT의 기본 구조에 대해 자세히 설명하겠습니다.
BERT의 기본 구조
BERT는 트랜스포머 인코더(Transformer Encoder)만으로 구성된 모델입니다. 트랜스포머 아키텍처는 인코더-디코더 구조로 이루어져 있지만, BERT는 인코더 부분만을 사용합니다. 주요 구성 요소는 다음과 같습니다:
- 입력 임베딩(Input Embeddings):
- 토큰 임베딩(Token Embeddings): 입력 문장의 각 단어는 고정된 크기의 벡터로 변환됩니다. BERT는 사전 훈련된 토큰 임베딩을 사용합니다.
- 세그먼트 임베딩(Segment Embeddings): BERT는 두 개의 문장을 한 쌍으로 처리할 수 있습니다. 이때 각 문장이 서로 다른 세그먼트로 구분됩니다. 세그먼트 임베딩은 각 단어가 속한 문장을 나타내는 벡터를 추가합니다.
- 위치 임베딩(Position Embeddings): 문장 내에서 각 단어의 위치 정보를 나타내는 벡터가 추가됩니다. 이는 단어 순서 정보를 제공합니다.
- 트랜스포머 인코더(Transformer Encoder):
- 멀티-헤드 셀프 어텐션(Multi-Head Self-Attention): 각 단어가 문장 내 다른 단어들과의 관계를 학습할 수 있게 합니다. 여러 개의 어텐션 헤드를 사용하여 다양한 관점에서 단어 간 관계를 모델링합니다.
- 피드포워드 뉴럴 네트워크(Feedforward Neural Network): 각 단어 임베딩을 비선형 변환합니다. 트랜스포머 인코더의 각 레이어는 멀티-헤드 셀프 어텐션과 피드포워드 뉴럴 네트워크로 구성됩니다.
- 레이어 정규화와 잔차 연결(Layer Normalization and Residual Connections): 각 서브 레이어 후에 레이어 정규화와 잔차 연결이 적용되어 훈련 안정성과 성능을 향상시킵니다.
- 출력(Outputs):
- 트랜스포머 인코더의 마지막 레이어는 입력 문장의 각 단어에 대한 컨텍스트 벡터를 출력합니다. 이 벡터는 단어의 문맥적 의미를 포함합니다.
- BERT는 사전 훈련 동안 양방향(Bidirectional)으로 문맥을 이해합니다. 즉, 각 단어 벡터는 해당 단어의 좌우 문맥을 모두 반영합니다.
사전 훈련(Pre-training)
BERT는 두 가지 주요 목표로 사전 훈련됩니다:
- 마스크드 언어 모델링(Masked Language Modeling, MLM):
- 입력 문장의 일부 단어를 무작위로 마스킹(masking)하고, 모델이 마스킹된 단어를 예측하도록 학습합니다. 이 과정을 통해 모델은 단어의 양방향 문맥을 학습합니다.
- 예를 들어, "The cat sat on the [MASK]."에서 "[MASK]"를 "mat"로 예측하는 작업입니다.
- 다음 문장 예측(Next Sentence Prediction, NSP):
- 두 문장이 주어졌을 때, 두 번째 문장이 첫 번째 문장의 다음 문장인지 여부를 예측하도록 학습합니다. 이 과정을 통해 모델은 문장 간의 관계를 학습합니다.
- 예를 들어, "The cat sat on the mat." 다음에 "It was a sunny day."가 올 수 있는지 예측하는 작업입니다.
파인튜닝(Fine-tuning)
BERT는 사전 훈련 후 다양한 NLP 작업에 맞게 파인튜닝될 수 있습니다. 파인튜닝 과정은 다음과 같습니다:
- 특정 작업에 맞게 아키텍처 수정: 예를 들어, 텍스트 분류 작업을 위해 마지막 레이어에 분류 헤드를 추가합니다.
- 사전 훈련된 가중치를 초기화: 사전 훈련된 BERT 모델의 가중치를 초기화하여 작업에 맞게 조정합니다.
- 작업 데이터로 재학습: 특정 작업의 데이터셋을 사용하여 모델을 재학습시킵니다.
BERT의 주요 특징
- 양방향 문맥 이해: BERT는 단어의 양쪽 문맥을 모두 사용하여 단어의 의미를 더 정확히 이해할 수 있습니다.
- 사전 훈련과 파인튜닝: BERT는 대규모 코퍼스에서 사전 훈련된 후, 특정 작업에 맞게 파인튜닝되어 다양한 NLP 작업에서 높은 성능을 발휘합니다.
- 다양한 NLP 작업 적용: BERT는 텍스트 분류, 질문 응답, 이름 인식 엔터티(NER), 번역 등 다양한 NLP 작업에 적용될 수 있습니다.
BERT는 이러한 특징들 덕분에 다양한 자연어 처리 응용 분야에서 뛰어난 성능을 보이며, NLP 연구와 실무에서 널리 사용되고 있습니다.
BERT도 GPT와 같이 Transformer 구조를 사용하고 있죠

BERT는 GPT와는 다르게 모든 데이터를 다 넣고 상관관계를 파악하며, encoder 구조만 사용하고 있습니다.
Pre-training은 위의 사진과 같이 마스킹된 단어 예측하기(Masked Language Modeling, MLM)와 다음 문장 예측하기(Next Sentence Prediction, NSP)로 진행됩니다.
그래서 우린 Pre-training 모델에 Fine-tuning하여 질문에 대한 답을 내주는 모델을 만들 예정이다.
BERT
Although the recipe for forward pass needs to be defined within this function, one should call the Module instance afterwards instead of this since the former takes care of running the pre and post processing steps while the latter silently ignores them.
huggingface.co
BERT for Question Answering 설명해주는 사이트
이 코드는 BERT 모델을 사용하여 질문 응답 작업을 수행하는 예제입니다. 주어진 질문과 텍스트를 기반으로 답변을 예측하고, 모델의 손실(loss)을 계산합니다. 아래는 각 단계에 대한 설명입니다.
1. 라이브러리 임포트 및 모델 로드
from transformers import AutoTokenizer, BertForQuestionAnswering
import torch- transformers 라이브러리에서 필요한 모듈을 임포트합니다.
- torch 라이브러리를 임포트하여 PyTorch를 사용합니다.
2. 토크나이저 및 모델 초기화
tokenizer = AutoTokenizer.from_pretrained("deepset/bert-base-cased-squad2")
model = BertForQuestionAnswering.from_pretrained("deepset/bert-base-cased-squad2")- deepset/bert-base-cased-squad2 사전 훈련된 모델의 토크나이저와 모델을 로드합니다.
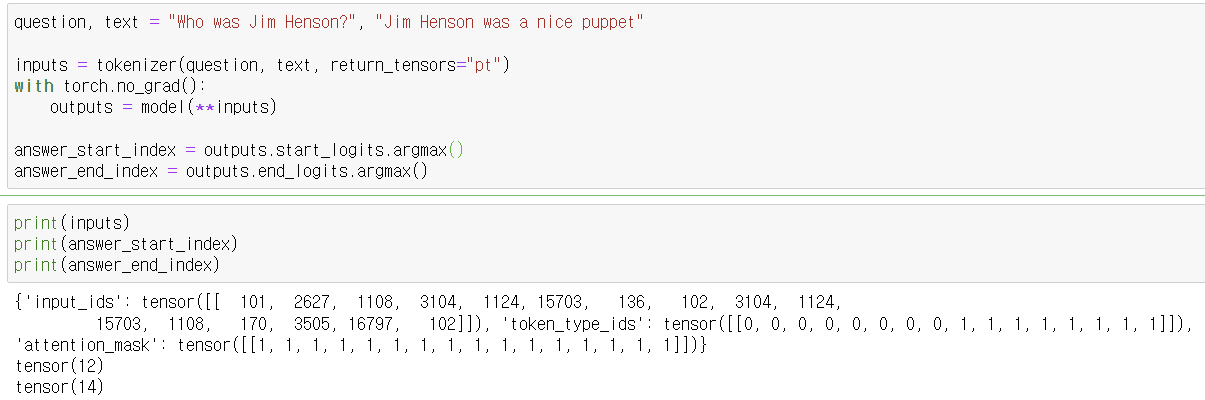
3. 질문과 텍스트 정의 및 토크나이징
question, text = "Who was Jim Henson?", "Jim Henson was a nice puppet"
inputs = tokenizer(question, text, return_tensors="pt")- 질문과 텍스트를 정의합니다.
- tokenizer를 사용하여 질문과 텍스트를 토큰화하고, PyTorch 텐서 형식으로 변환합니다.
4. 모델 예측
with torch.no_grad():
outputs = model(**inputs)- torch.no_grad() 블록 내에서 모델을 실행하여 예측을 수행합니다.
- outputs는 모델의 예측 결과를 포함합니다.
5. 답변의 시작과 끝 인덱스 예측
answer_start_index = outputs.start_logits.argmax()
answer_end_index = outputs.end_logits.argmax()- 예측된 답변의 시작과 끝 인덱스를 찾기 위해 로짓(logits)의 argmax를 계산합니다.
6. 예측된 답변 토큰 디코딩
predict_answer_tokens = inputs.input_ids[0, answer_start_index : answer_end_index + 1]
tokenizer.decode(predict_answer_tokens, skip_special_tokens=True)- 예측된 답변 토큰을 추출하여 디코딩합니다.
- 예측된 답변은 "a nice puppet"입니다.
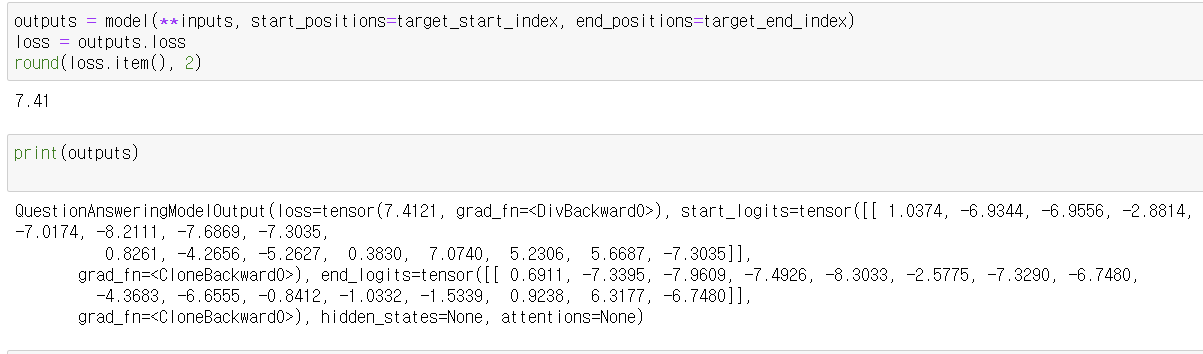
7. 타겟 답변 인덱스 설정
target_start_index = torch.tensor([14])
target_end_index = torch.tensor([15])- 타겟 답변의 시작과 끝 인덱스를 정의합니다. 여기서 "nice puppet"이 타겟입니다.
8. 손실 계산
outputs = model(**inputs, start_positions=target_start_index, end_positions=target_end_index)
loss = outputs.loss
round(loss.item(), 2)- 주어진 타겟 시작과 끝 인덱스를 사용하여 모델을 다시 실행하고, 손실(loss)을 계산합니다.
- 손실 값을 소수점 두 자리까지 반올림하여 출력합니다.
요약
이 코드는 다음과 같은 과정을 거쳐 질문 응답 작업을 수행합니다:
- 필요한 라이브러리를 임포트하고, 사전 훈련된 BERT 모델과 토크나이저를 로드합니다.
- 질문과 텍스트를 토크나이징합니다.
- 모델을 사용하여 답변의 시작과 끝 인덱스를 예측합니다.
- 예측된 답변을 디코딩하여 출력합니다.
- 타겟 답변 인덱스를 설정하고, 모델을 다시 실행하여 손실을 계산합니다.
이 과정을 통해 모델의 예측 성능을 평가하고, 손실을 계산할 수 있습니다.
기존 예제 토크나이저 사용시
google-bert/bert-base-cased 사용시

오 결과가 확 바뀐 것을 볼 수 있다.

왜 거꾸로 잡은거지...?
그리고 그냥
이름을 잡아버린것도...

오차도...
흠..........
설마 좀 뒤섞였나 싶어서 다시 진행해보니

이래도 이상한 걸 가지고 오네요
제대로된 모델을 가지고 오지 않아서 그런가 보네요
그럼 비슷한 모델을 가지고와서 다시 진행해보겠씁니다.
bert-large-uncased-whole-word-masking-finetuned-squad : BERT large 모델로, 전체 단어 마스킹 기법을 사용하여 사전 훈련되고 SQuAD 데이터셋으로 미세 조정(fine-tuning)되었습니다.
tokenizer = AutoTokenizer.from_pretrained("bert-large-uncased-whole-word-masking-finetuned-squad")
model = BertForQuestionAnswering.from_pretrained("bert-large-uncased-whole-word-masking-finetuned-squad")
비슷한 결과를 보여준다.
twmkn9/albert-base-v2-squad2 : :ALBERT 모델의 base 버전으로, SQuAD 2.0 데이터셋으로 미세 조정되었습니다. ALBERT는 BERT의 경량화된 버전으로, 파라미터 수를 줄여 더 효율적인 모델을 제공합니다.
from transformers import AutoTokenizer, AlbertForQuestionAnswering
tokenizer = AutoTokenizer.from_pretrained("twmkn9/albert-base-v2-squad2")
model = AlbertForQuestionAnswering.from_pretrained("twmkn9/albert-base-v2-squad2")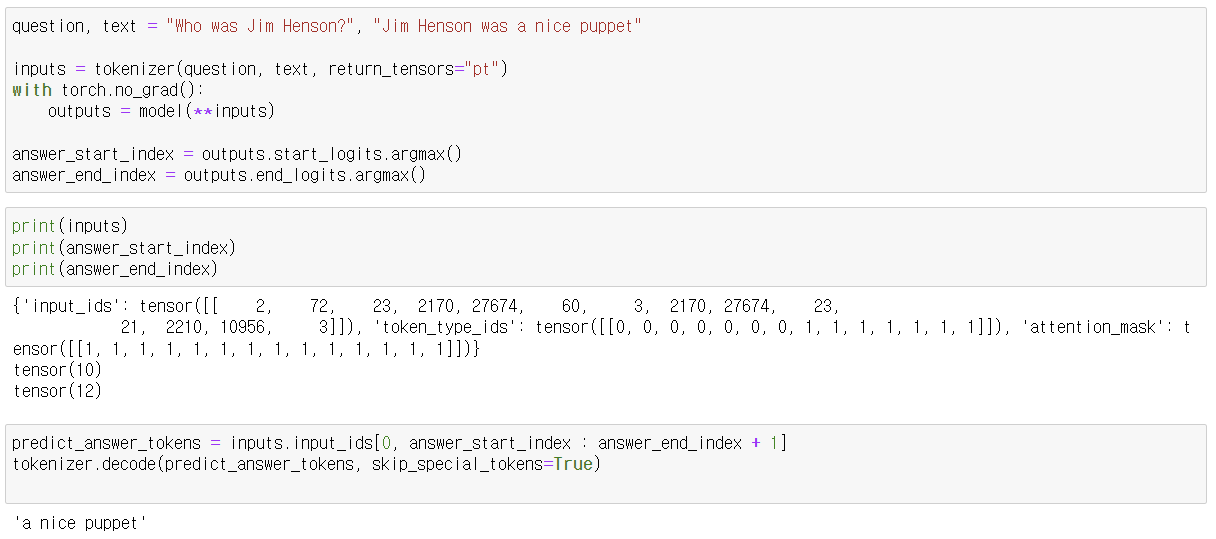
distilbert-base-cased-distilled-squad : DistilBERT 모델로, BERT 모델을 압축하여 경량화한 버전입니다. SQuAD 데이터셋으로 미세 조정되었습니다.
from transformers import AutoTokenizer, DistilBertForQuestionAnswering
import torch

# 올바른 모델 체크포인트 사용
tokenizer = AutoTokenizer.from_pretrained("distilbert-base-cased-distilled-squad")
model = DistilBertForQuestionAnswering.from_pretrained("distilbert-base-cased-distilled-squad")
전부 결과에는 큰차이를 보이고 있지 않는다.
roberta-base-squad2 : RoBERTa 모델의 base 버전으로, SQuAD 2.0 데이터셋으로 미세 조정되었습니다. RoBERTa는 BERT의 변형으로, 더 많은 데이터와 더 긴 학습 시간으로 사전 훈련된 모델입니다.
from transformers import AutoTokenizer, RobertaForQuestionAnswering
import torch

# 올바른 모델 체크포인트 사용
tokenizer = AutoTokenizer.from_pretrained("deepset/roberta-base-squad2")
model = RobertaForQuestionAnswering.from_pretrained("deepset/roberta-base-squad2")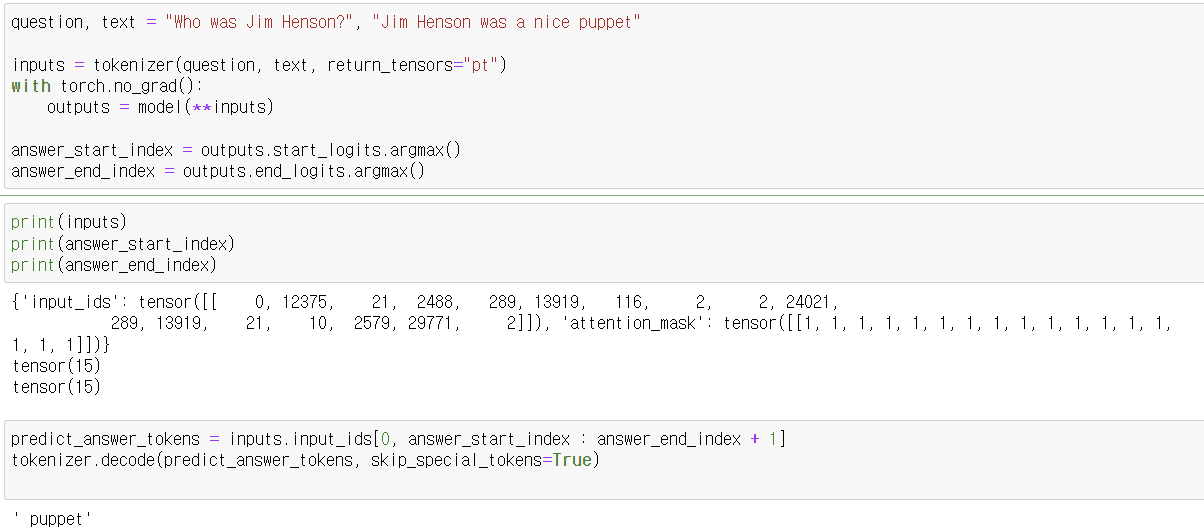
더 많은 데이터를 통해 사전학습했다고 했는데 확실히 필요한 단어만 잡는 모습을 보여준다.
xlnet-base-cased-squad2 : XLNet 모델의 base 버전으로, SQuAD 2.0 데이터셋으로 미세 조정되었습니다. XLNet은 BERT와 달리 오토레그레시브 접근 방식을 사용하여 문맥을 양방향으로 모델링합니다.
이건 사용이 안되네요...ㅠ
다양한 사전 학습된 모델들은 서로 다른 목적과 특성을 가지고 있습니다. 여기에서는 bert-large-uncased-whole-word-masking-finetuned-squad, deepset/bert-base-cased-squad2, bert-base-uncased, distilbert-base-cased-distilled-squad, roberta-base-squad2 모델들의 차이를 설명하겠습니다.
1. bert-large-uncased-whole-word-masking-finetuned-squad
- 모델 크기: Large
- bert-large는 24개의 레이어와 340M 파라미터를 가지고 있습니다.
- 케이싱: Uncased
- 텍스트를 소문자로 변환한 후 처리합니다.
- 특징: Whole Word Masking
- Whole Word Masking은 마스킹 과정에서 하나의 단어 전체를 마스킹합니다.
- 파인튜닝: SQuAD
- SQuAD 데이터셋에 대해 파인튜닝되었습니다.
- 사용 사례: 추출적 질문 응답
2. deepset/bert-base-cased-squad2
- 모델 크기: Base
- bert-base는 12개의 레이어와 110M 파라미터를 가지고 있습니다.
- 케이싱: Cased
- 대소문자를 구분하여 처리합니다.
- 특징: 일반 BERT 모델
- 기본 BERT 모델이며, 특별한 마스킹 기법을 사용하지 않습니다.
- 파인튜닝: SQuAD2.0
- SQuAD2.0 데이터셋에 대해 파인튜닝되었습니다.
- 사용 사례: 추출적 질문 응답
3. bert-base-uncased
- 모델 크기: Base
- 12개의 레이어와 110M 파라미터를 가지고 있습니다.
- 케이싱: Uncased
- 텍스트를 소문자로 변환한 후 처리합니다.
- 특징: 일반 BERT 모델
- 기본 BERT 모델이며, 특별한 마스킹 기법을 사용하지 않습니다.
- 파인튜닝: 없음 (사전 학습된 모델)
- 특정 작업에 대해 파인튜닝되지 않은 일반 BERT 모델입니다.
- 사용 사례: 다양한 NLP 작업에 사용 가능
4. distilbert-base-cased-distilled-squad
- 모델 크기: DistilBERT Base
- DistilBERT는 BERT의 경량화 버전으로, 6개의 레이어와 약 66M 파라미터를 가지고 있습니다.
- 케이싱: Cased
- 대소문자를 구분하여 처리합니다.
- 특징: 경량화 및 속도 향상
- Distillation 기법을 사용하여 BERT 모델을 경량화하였습니다.
- 파인튜닝: SQuAD
- SQuAD 데이터셋에 대해 파인튜닝되었습니다.
- 사용 사례: 추출적 질문 응답, 리소스가 제한된 환경에서의 NLP 작업
5. roberta-base-squad2
- 모델 크기: Base
- roberta-base는 12개의 레이어와 125M 파라미터를 가지고 있습니다.
- 케이싱: Cased
- RoBERTa 모델은 항상 대소문자를 구분합니다.
- 특징: RoBERTa 모델
- BERT의 변형 모델로, 더 큰 데이터셋과 긴 학습 시간으로 학습되었습니다.
- 파인튜닝: SQuAD2.0
- SQuAD2.0 데이터셋에 대해 파인튜닝되었습니다.
- 사용 사례: 추출적 질문 응답
요약
- 모델 크기: bert-large-uncased-whole-word-masking-finetuned-squad > roberta-base-squad2 > bert-base-cased-squad2, bert-base-uncased, distilbert-base-cased-distilled-squad
- 케이싱: bert-large-uncased-whole-word-masking-finetuned-squad 및 bert-base-uncased는 대소문자 구분 없이 처리합니다. 다른 모델들은 대소문자를 구분합니다.
- 특징: whole-word-masking을 사용하는 모델은 bert-large-uncased-whole-word-masking-finetuned-squad입니다. distilbert-base-cased-distilled-squad는 경량화된 모델입니다. roberta-base-squad2는 BERT의 변형 모델인 RoBERTa를 사용합니다.
- 파인튜닝 데이터셋: 각 모델은 SQuAD 또는 SQuAD2.0 데이터셋에 대해 파인튜닝되었습니다. bert-base-uncased는 특정 작업에 대해 파인튜닝되지 않은 일반 BERT 모델입니다.
https://huggingface.co/docs/transformers/v4.41.0/en/model_doc/bert#transformers.BertTokenizer
BERT
Although the recipe for forward pass needs to be defined within this function, one should call the Module instance afterwards instead of this since the former takes care of running the pre and post processing steps while the latter silently ignores them.
huggingface.co
여기는 Tokenizer 사이트!
다양한 토크나이저 테스트를 위한 예시 코드들!
주어진 질문에 대한 정답을 텍스트에서 추출해 보겠습니다.
예제 텍스트
The Renaissance was a fervent period of European cultural, artistic, political, and economic "rebirth" following the Middle Ages. Generally described as taking place from the 14th century to the 17th century, the Renaissance promoted the rediscovery of classical philosophy, literature, and art. Some of the greatest thinkers, authors, statesmen, scientists, and artists in human history thrived during this era, while global exploration opened up new lands and cultures to European commerce. The Renaissance is credited with bridging the gap between the Middle Ages and modern-day civilization.

One of the most famous figures of the Renaissance was Leonardo da Vinci, a polymath whose areas of interest included invention, painting, sculpting, architecture, science, music, mathematics, engineering, literature, anatomy, geology, astronomy, botany, writing, history, and cartography. He is widely considered one of the most diversely talented individuals ever to have lived. His most famous works include the paintings "Mona Lisa" and "The Last Supper". Da Vinci's contributions to science and engineering were ahead of his time, and his notebooks, which contain diagrams, scientific drawings, and his thoughts on a wide range of subjects, reveal a mind of extraordinary insight and creativity.

The Renaissance also saw the emergence of other notable figures such as Michelangelo, Raphael, and Donatello, who were renowned for their contributions to art and sculpture. The period also experienced significant developments in science and literature, with figures such as Galileo Galilei and William Shakespeare making lasting impacts. Galileo's advancements in astronomy and Shakespeare's prolific output of plays and sonnets are still studied and revered today.

This period of cultural "rebirth" was also marked by the rise of humanism, a philosophical movement that emphasized the value and agency of human beings and preferred critical thinking and evidence over established doctrine or faith. Humanism profoundly influenced the art, literature, and education of the Renaissance, leading to an increased emphasis on the study of classical texts and the promotion of a well-rounded education.

The Renaissance was a time of significant political change as well. The invention of the printing press by Johannes Gutenberg in the mid-15th century played a crucial role in the spread of knowledge, making books more accessible and fostering an environment of learning and inquiry. This period also saw the decline of feudalism and the rise of more centralized forms of government, laying the groundwork for the modern nation-state.

In summary, the Renaissance was a dynamic period of history characterized by a resurgence of interest in the classical past, remarkable achievements in the arts and sciences, and profound changes in political and social structures. It set the stage for the subsequent developments of the modern era and left a lasting legacy that continues to influence contemporary society.
예제 질문
- When did the Renaissance take place?
- Who is considered one of the most diversely talented individuals of the Renaissance?
- What are some of Leonardo da Vinci's most famous works?
- Which invention by Johannes Gutenberg played a crucial role in the spread of knowledge during the Renaissance?
- Who were some of the notable figures in art during the Renaissance?
- What philosophical movement emphasized the value and agency of human beings during the Renaissance?
- How did Galileo Galilei contribute to the Renaissance?
- How did the Renaissance influence modern-day civilization?
- What impact did the printing press have on the Renaissance?
- What changes in political and social structures occurred during the Renaissance?
정답
- When did the Renaissance take place?
- 정답: "from the 14th century to the 17th century"
- Who is considered one of the most diversely talented individuals of the Renaissance?
- 정답: "Leonardo da Vinci"
- What are some of Leonardo da Vinci's most famous works?
- 정답: "the paintings 'Mona Lisa' and 'The Last Supper'"
- Which invention by Johannes Gutenberg played a crucial role in the spread of knowledge during the Renaissance?
- 정답: "the printing press"
- Who were some of the notable figures in art during the Renaissance?
- 정답: "Michelangelo, Raphael, and Donatello"
- What philosophical movement emphasized the value and agency of human beings during the Renaissance?
- 정답: "humanism"
- How did Galileo Galilei contribute to the Renaissance?
- 정답: "Galileo's advancements in astronomy"
- How did the Renaissance influence modern-day civilization?
- 정답: "bridging the gap between the Middle Ages and modern-day civilization"
- What impact did the printing press have on the Renaissance?
- 정답: "played a crucial role in the spread of knowledge, making books more accessible and fostering an environment of learning and inquiry"
- What changes in political and social structures occurred during the Renaissance?
- 정답: "the decline of feudalism and the rise of more centralized forms of government"
테스트 코드
이제 이 질문들을 모델에 테스트해볼 수 있습니다.
코드에서 토크나이저 최대 길이 제한해줘야 합니다.
from transformers import AutoTokenizer, BertForQuestionAnswering
import torch

tokenizer = AutoTokenizer.from_pretrained("bert-large-uncased-whole-word-masking-finetuned-squad")
model = BertForQuestionAnswering.from_pretrained("bert-large-uncased-whole-word-masking-finetuned-squad")

text = """
The Renaissance was a fervent period of European cultural, artistic, political, and economic 'rebirth' following the Middle Ages. Generally described as taking place from the 14th century to the 17th century, the Renaissance promoted the rediscovery of classical philosophy, literature, and art. Some of the greatest thinkers, authors, statesmen, scientists, and artists in human history thrived during this era, while global exploration opened up new lands and cultures to European commerce. The Renaissance is credited with bridging the gap between the Middle Ages and modern-day civilization.

One of the most famous figures of the Renaissance was Leonardo da Vinci, a polymath whose areas of interest included invention, painting, sculpting, architecture, science, music, mathematics, engineering, literature, anatomy, geology, astronomy, botany, writing, history, and cartography. He is widely considered one of the most diversely talented individuals ever to have lived. His most famous works include the paintings "Mona Lisa" and "The Last Supper". Da Vinci's contributions to science and engineering were ahead of his time, and his notebooks, which contain diagrams, scientific drawings, and his thoughts on a wide range of subjects, reveal a mind of extraordinary insight and creativity.

The Renaissance also saw the emergence of other notable figures such as Michelangelo, Raphael, and Donatello, who were renowned for their contributions to art and sculpture. The period also experienced significant developments in science and literature, with figures such as Galileo Galilei and William Shakespeare making lasting impacts. Galileo's advancements in astronomy and Shakespeare's prolific output of plays and sonnets are still studied and revered today.

This period of cultural 'rebirth' was also marked by the rise of humanism, a philosophical movement that emphasized the value and agency of human beings and preferred critical thinking and evidence over established doctrine or faith. Humanism profoundly influenced the art, literature, and education of the Renaissance, leading to an increased emphasis on the study of classical texts and the promotion of a well-rounded education.

The Renaissance was a time of significant political change as well. The invention of the printing press by Johannes Gutenberg in the mid-15th century played a crucial role in the spread of knowledge, making books more accessible and fostering an environment of learning and inquiry. This period also saw the decline of feudalism and the rise of more centralized forms of government, laying the groundwork for the modern nation-state.

In summary, the Renaissance was a dynamic period of history characterized by a resurgence of interest in the classical past, remarkable achievements in the arts and sciences, and profound changes in political and social structures. It set the stage for the subsequent developments of the modern era and left a lasting legacy that continues to influence contemporary society.
"""

questions = [
    "When did the Renaissance take place?",
    "Who is considered one of the most diversely talented individuals of the Renaissance?",
    "What are some of Leonardo da Vinci's most famous works?",
    "Which invention by Johannes Gutenberg played a crucial role in the spread of knowledge during the Renaissance?",
    "Who were some of the notable figures in art during the Renaissance?",
    "What philosophical movement emphasized the value and agency of human beings during the Renaissance?",
    "How did Galileo Galilei contribute to the Renaissance?",
    "How did the Renaissance influence modern-day civilization?",
    "What impact did the printing press have on the Renaissance?",
    "What changes in political and social structures occurred during the Renaissance?"
]

for question in questions:
    inputs = tokenizer(question, text, return_tensors="pt")
    with torch.no_grad():
        outputs = model(**inputs)

    answer_start_index = outputs.start_logits.argmax()
    answer_end_index = outputs.end_logits.argmax()

    predict_answer_tokens = inputs.input_ids[0, answer_start_index : answer_end_index + 1]
    answer = tokenizer.decode(predict_answer_tokens, skip_special_tokens=True)
    print(f"Question: {question}")
    print(f"Answer: {answer}\n")
위 코드를 실행하면 각 질문에 대한 예측된 답변을 출력할 수 있습니다. 이를 통해 모델이 주어진 텍스트에서 얼마나 정확하게 정보를 추출하는지 확인할 수 있습니다.
deepset/roberta-base-squad2모델이 제일 좋네요 ㅎㅎ....
https://github.com/jinkilee/hello-transformer/blob/master/research/chapter4/squad/run_evaluate.py
hello-transformer/research/chapter4/squad/run_evaluate.py at master · jinkilee/hello-transformer
Contribute to jinkilee/hello-transformer development by creating an account on GitHub.
github.com
https://github.com/jinkilee/hello-transformer/blob/master/research/chapter4/squad/evaluate.py
hello-transformer/research/chapter4/squad/evaluate.py at master · jinkilee/hello-transformer
Contribute to jinkilee/hello-transformer development by creating an account on GitHub.
github.com
평가용 코드입니다.
import os
import json

# 파일 경로를 지정합니다.
filename = "train-v2.json"

# 지정된 파일을 읽기 모드로 열고 JSON 데이터를 로드합니다.
with open(filename, "r", encoding='utf-8') as reader:
    input_data = json.load(reader)["data"]

# 로드된 데이터의 각 항목(entry)에 대해 반복합니다.
for entry in input_data:
    # 각 항목의 각 문단(paragraph)에 대해 반복합니다.
    for paragraph in entry["paragraphs"]:
        # 문맥(context)을 추출하여 출력합니다.
        context = paragraph['context']
        print(context)
        print()

        # 각 문단의 질문-답변(qa) 세트에 대해 반복합니다.
        for qa in paragraph['qas']:
            # 해당 질문이 답변 불가능한지 여부를 확인합니다.
            is_impossible = qa['is_impossible']

            if not is_impossible:
                # 답변이 가능한 경우, 첫 번째 답변을 추출합니다.
                answer = qa['answers'][0]
                original_answer = answer['text']
                answer_start = answer['answer_start']

            # 질문 ID와 질문 텍스트를 추출합니다.
            qid = qa['id']
            question = qa['question']

            # 질문 ID, 질문 텍스트, 답변을 출력합니다.
            print(qid, question, answer)

        # 첫 번째 문단만 처리하고 루프를 종료합니다.
        break
    # 첫 번째 항목만 처리하고 루프를 종료합니다.
    break
Beyoncé Giselle Knowles-Carter (/biːˈjɒnseɪ/ bee-YON-say) (born September 4, 1981) is an American singer, songwriter, record producer and actress. Born and raised in Houston, Texas, she performed in various singing and dancing competitions as a child, and rose to fame in the late 1990s as lead singer of R&B girl-group Destiny's Child. Managed by her father, Mathew Knowles, the group became one of the world's best-selling girl groups of all time. Their hiatus saw the release of Beyoncé's debut album, Dangerously in Love (2003), which established her as a solo artist worldwide, earned five Grammy Awards and featured the Billboard Hot 100 number-one singles "Crazy in Love" and "Baby Boy".
56be85543aeaaa14008c9063 When did Beyonce start becoming popular? {'text': 'in the late 1990s', 'answer_start': 269}
56be85543aeaaa14008c9065 What areas did Beyonce compete in when she was growing up? {'text': 'singing and dancing', 'answer_start': 207}
56be85543aeaaa14008c9066 When did Beyonce leave Destiny's Child and become a solo singer? {'text': '2003', 'answer_start': 526}
56bf6b0f3aeaaa14008c9601 In what city and state did Beyonce grow up? {'text': 'Houston, Texas', 'answer_start': 166}
56bf6b0f3aeaaa14008c9602 In which decade did Beyonce become famous? {'text': 'late 1990s', 'answer_start': 276}
56bf6b0f3aeaaa14008c9603 In what R&B group was she the lead singer? {'text': "Destiny's Child", 'answer_start': 320}
56bf6b0f3aeaaa14008c9604 What album made her a worldwide known artist? {'text': 'Dangerously in Love', 'answer_start': 505}
56bf6b0f3aeaaa14008c9605 Who managed the Destiny's Child group? {'text': 'Mathew Knowles', 'answer_start': 360}
56d43c5f2ccc5a1400d830a9 When did Beyoncé rise to fame? {'text': 'late 1990s', 'answer_start': 276}
56d43c5f2ccc5a1400d830aa What role did Beyoncé have in Destiny's Child? {'text': 'lead singer', 'answer_start': 290}
56d43c5f2ccc5a1400d830ab What was the first album Beyoncé released as a solo artist? {'text': 'Dangerously in Love', 'answer_start': 505}
56d43c5f2ccc5a1400d830ac When did Beyoncé release Dangerously in Love? {'text': '2003', 'answer_start': 526}
56d43c5f2ccc5a1400d830ad How many Grammy awards did Beyoncé win for her first solo album? {'text': 'five', 'answer_start': 590}
56d43ce42ccc5a1400d830b4 What was Beyoncé's role in Destiny's Child? {'text': 'lead singer', 'answer_start': 290}
56d43ce42ccc5a1400d830b5 What was the name of Beyoncé's first solo album? {'text': 'Dangerously in Love', 'answer_start': 505}출력은 이렇게 나옵니다.
데이터가 어떻게 되어있는지 확인하는 단계였스빈다.
import os
import json
import torch
from torch.utils.data import Dataset, TensorDataset

# import module we'll need to import our custom module
from shutil import copyfile

# copy our file into the working directory (make sure it has .py suffix)
copyfile(src = "/kaggle/input/2024-1-nlp-4/feature.py", dst = "/kaggle/working/feature.py")
from feature import convert_examples_to_features

# 공백 문자인지 확인하는 함수
def is_whitespace(c):
    if c == " " or c == "\t" or c == "\r" or c == "\n" or ord(c) == 0x202F:
        return True
    return False

# SquadExample 클래스 정의
class SquadExample():
    def __init__(self, qid, context, question, answer, start, end, is_impossible):
        self.qid = qid
        self.context = context
        self.question = question
        self.answer = answer
        self.start = start
        self.end = end
        self.is_impossible = is_impossible

    def __repr__(self):
        # 객체의 문자열 표현을 정의합니다.

        #return self.context[self.start:self.end]
        #if self.context[self.start:self.end] != self.answer:
        #    return 'NA!! {} - {}'.format(self.context[self.start:self.end], answer)
        return 'id:{}  question:{}...  answer:{}...  is_impossible:{}'.format(
            self.qid,
            self.question[:10],
            self.answer[:10],
self.is_impossible)이 클래스는 SQuAD(Stanford Question Answering Dataset)와 같은 데이터셋을 처리하기 위해 사용됩니다. SquadExample 클래스는 질문-답변 쌍과 관련된 정보를 하나의 객체로 묶어 저장합니다. 이 클래스는 데이터셋을 효과적으로 관리하고, 모델 학습 및 평가에 필요한 데이터를 구조화하는 데 도움을 줍니다.
주요 목적
- 데이터 구조화:
- 각 예제를 하나의 객체로 묶어 관련된 질문, 문맥, 답변, 그리고 답변의 시작과 끝 위치를 포함합니다.
- 이는 데이터셋의 예제를 보다 직관적으로 다루고 접근할 수 있게 합니다.
- 데이터 처리:
- 데이터셋을 로드하고, 모델 입력 형식에 맞게 변환할 때 사용됩니다.
- 예제를 토큰화하거나 피처로 변환할 때 유용합니다.
클래스 설명
- 속성:
- qid: 질문의 고유 ID
- context: 질문에 답변이 포함된 문맥
- question: 실제 질문
- answer: 문맥 내에서 질문에 대한 정답
- start: 문맥 내에서 답변이 시작되는 위치 인덱스
- end: 문맥 내에서 답변이 끝나는 위치 인덱스
- is_impossible: 질문에 대한 답변이 문맥 내에 존재하지 않는지 여부 (True/False)
- 메서드:
- __init__: 클래스 인스턴스를 초기화하는 생성자
- __repr__: 객체의 문자열 표현을 정의하여, 디버깅 및 로깅 시 유용하게 사용됨
사용 예
# SQuAD 데이터셋에서 한 예제를 가져와서 SquadExample 객체로 변환
example = SquadExample(
    qid="56be85543aeaaa14008c9063",
    context="Jim Henson was a nice puppet",
    question="Who was Jim Henson?",
    answer="a nice puppet",
    start=12,
    end=25,
    is_impossible=False
)

# 객체를 출력하면 __repr__ 메서드가 호출되어 객체 정보를 출력함
print(example)
출력:
id:56be85543aeaaa14008c9063 question:Who was Ji... answer:a nice pu... is_impossible:False이렇게 함으로써 SQuAD 데이터셋의 각 예제를 구조화된 형태로 관리할 수 있으며, 이는 모델 학습 및 평가를 위한 데이터 처리 과정에서 매우 유용합니다.
# SquadDataset 클래스 정의
class SquadDataset(Dataset):
    def __init__(self, path, tokenizer, is_train=True, is_inference=False):
        '''
        path: SquadDataset 데이터셋 위치
        tokenizer: Squad 데이터셋을 토크나이징할 토크나이저, ex) BertTokenizer
        is_train: SquadDataset을 정의하는 목적이 모델 학습용일 경우 True, 그렇지 않으면 False
        is_inference: SquadDataset을 정의하는 목적이 인퍼런스용일 경우 True, 그렇지 않으면 False
        '''

        if is_train:
            filename = os.path.join(path, 'train-v2.json')
        else:
            if is_inference:
                filename = os.path.join(path, 'test-v2.json')
            else:
                filename = os.path.join(path, 'dev-v2.json')

        # 캐시 파일 경로를 정의합니다.
        cache_dir = "/kaggle/working"
        cached_features_file = os.path.join(cache_dir, 'cached_{}_64.cache'.format('train' if is_train else 'valid'))
        cached_examples_file = os.path.join(cache_dir, 'cached_example_{}_64.cache'.format('train' if is_train else 'valid'))

        # 캐시 파일이 존재하는지 확인합니다.
        if os.path.exists(cached_features_file):
            print('cache file exists')
            self.features = torch.load(cached_features_file)
        else:
            print('cache file does not exist')

            # JSON 파일을 읽어옵니다.
            with open(filename, "r", encoding='utf-8') as reader:
                input_data = json.load(reader)["data"]

            self.examples = []
            # 각 항목(entry)에 대해 반복합니다.
            for entry in input_data:
                for paragraph in entry["paragraphs"]:
                    context = paragraph['context']

                    doc_tokens = []
                    char_to_word_offset = []
                    prev_is_whitespace = True
                    # 문맥(context)을 토큰화합니다.
                    for c in context:
                        if is_whitespace(c):
                            prev_is_whitespace = True
                        else:
                            if prev_is_whitespace:
                                doc_tokens.append(c)
                            else:
                                doc_tokens[-1] += c
                            prev_is_whitespace = False
                        char_to_word_offset.append(len(doc_tokens) - 1)

                    # 질문-답변 세트를 처리합니다.
                    for qa in paragraph['qas']:
                        is_impossible = qa['is_impossible']

                        if not is_impossible:
                            answer = qa['answers'][0]
                            original_answer = answer['text']
                            answer_start = answer['answer_start']

                            answer_length = len(original_answer)
                            start_pos = char_to_word_offset[answer_start]
                            end_pos = char_to_word_offset[answer_start + answer_length - 1]

                            answer_end = answer_start + len(original_answer)
                        else:
                            original_answer = ''
                            start_pos = 1
                            end_pos = -1

                        # SquadExample 객체를 생성합니다.
                        example = SquadExample(
                            qid=qa['id'],
                            context=doc_tokens,
                            question=qa['question'],
                            answer=original_answer,
                            start=start_pos,
                            end=end_pos,
                            is_impossible=is_impossible)
                        self.examples.append(example)
            print('examples: {}'.format(len(self.examples)))

            # 예제를 특징(feature)으로 변환합니다.
            self.features = convert_examples_to_features(
                examples=self.examples,
                tokenizer=tokenizer,
                max_seq_length=384,
                doc_stride=128,
                max_query_length=64,
                is_training=True if not is_inference else False)
            print('is_training: {}'.format(True if not is_inference else False))

            # 특징(feature)을 캐시 파일에 저장합니다.

            torch.save(self.examples, cached_examples_file)
            torch.save(self.features, cached_features_file)

        '''
        # Convert to Tensors and build dataset
        all_input_ids = torch.tensor([f.input_ids for f in self.features], dtype=torch.long)
        all_input_mask = torch.tensor([f.input_mask for f in self.features], dtype=torch.long)
        all_segment_ids = torch.tensor([f.segment_ids for f in self.features], dtype=torch.long)
        all_cls_index = torch.tensor([f.cls_index for f in self.features], dtype=torch.long)
        all_p_mask = torch.tensor([f.p_mask for f in self.features], dtype=torch.float)
        if is_train:
            all_start_positions = torch.tensor([f.start_position for f in self.features], dtype=torch.long)
            all_end_positions = torch.tensor([f.end_position for f in self.features], dtype=torch.long)
            dataset = TensorDataset(all_input_ids, all_input_mask, all_segment_ids,
                                    all_start_positions, all_end_positions,
                                    all_cls_index, all_p_mask)
        else:
            all_example_index = torch.arange(all_input_ids.size(0), dtype=torch.long)
            dataset = TensorDataset(all_input_ids, all_input_mask, all_segment_ids, all_example_index, all_cls_index, all_p_mask)
        return dataset
        '''

    # 데이터셋의 길이를 반환합니다.
    def __len__(self):
        return len(self.features)

    # 주어진 인덱스의 특징(feature)을 반환합니다.
    def __getitem__(self, idx):
return self.features[idx]네, 맞습니다. 해당 코드는 SquadExample 객체로 데이터를 정리하기 전에 필요한 전처리 과정을 수행합니다. 데이터셋을 로드하고, 토큰화하며, 각 질문-답변 쌍을 처리한 후, 최종적으로 SquadExample 객체를 생성하는 과정을 포함하고 있습니다. 아래에 각 부분에 대한 설명을 추가합니다:
주요 목적
- 데이터 로드 및 캐싱:
- SQuAD 데이터셋을 JSON 파일에서 로드하고, 캐시 파일을 이용해 로딩 속도를 최적화합니다.
- 캐시 파일이 존재하면 이를 로드하고, 존재하지 않으면 데이터를 처리하여 캐시 파일을 생성합니다.
- 문맥 토큰화:
- 문맥(context)을 토큰화하여 단어 단위로 나누고, 각 문자에 대한 단어 오프셋을 기록합니다.
- 공백 문자를 처리하여 단어 경계를 구분합니다.
- 질문-답변 쌍 처리:
- 각 질문-답변 쌍을 처리하여, 정답이 포함된 경우와 포함되지 않은 경우를 구분합니다.
- 정답이 포함된 경우, 정답의 시작 위치와 끝 위치를 계산합니다.
- SquadExample 객체 생성:
- 위에서 처리된 데이터를 바탕으로 SquadExample 객체를 생성하여 리스트에 추가합니다.
- 피처 변환 및 캐싱:
- SquadExample 객체 리스트를 토크나이저를 이용해 모델 입력 형식에 맞는 특징(feature)으로 변환합니다.
- 변환된 특징을 캐시 파일에 저장하여, 이후 로딩 시간을 단축합니다.
이 코드는 SQuAD 데이터셋을 효과적으로 로드하고 처리하며, 모델 학습 및 평가를 위한 데이터 준비 과정을 자동화합니다.
import torch
from torch.utils.data import DataLoader

# SquadDataLoader 클래스 정의
class SquadDataLoader(DataLoader):
    def __init__(self, dataset, batch_size, is_inference=False, shuffle=True):
        '''
        dataset: SquadDataset으로 정의한 데이터셋 객체
        batch_size: 배치 사이즈
        is_inference: SquadDataLoader를 인퍼런스 목적으로 사용할 경우 True, 그렇지 않으면 False
        shuffle: 데이터의 순서를 섞을 경우 True, 그렇지 않으면 False
        '''
        self.is_inference = is_inference
        # DataLoader 클래스의 초기화 메서드를 호출합니다.
        super().__init__(dataset, collate_fn=self.squad_collate_fn, batch_size=batch_size, shuffle=shuffle)

    # 특성을 모으는 함수 정의
    def squad_collate_fn(self, features):
        # 각 특성에서 input_ids를 추출하여 텐서로 변환합니다.
        all_input_ids = torch.tensor([f.input_ids for f in features], dtype=torch.long)
        # 각 특성에서 input_mask를 추출하여 텐서로 변환합니다.
        all_input_mask = torch.tensor([f.input_mask for f in features], dtype=torch.long)
        # 각 특성에서 segment_ids를 추출하여 텐서로 변환합니다.
        all_segment_ids = torch.tensor([f.segment_ids for f in features], dtype=torch.long)
        # 각 특성에서 cls_index를 추출하여 텐서로 변환합니다.
        all_cls_index = torch.tensor([f.cls_index for f in features], dtype=torch.long)
        # 각 특성에서 p_mask를 추출하여 텐서로 변환합니다.
        all_p_mask = torch.tensor([f.p_mask for f in features], dtype=torch.float)

        # 인퍼런스 모드일 경우 6개의 텐서를 반환합니다.
        if self.is_inference:
            all_example_index = torch.arange(all_input_ids.size(0), dtype=torch.long)
            return all_input_ids, all_input_mask, all_segment_ids, all_cls_index, all_p_mask, all_example_index
        # 학습 모드일 경우 7개의 텐서를 반환합니다.
        else:
            all_start_positions = torch.tensor([f.start_position for f in features], dtype=torch.long)
            all_end_positions = torch.tensor([f.end_position for f in features], dtype=torch.long)
return all_input_ids, all_input_mask, all_segment_ids, all_cls_index, all_p_mask, all_start_positions, all_end_positions이 코드는 SquadDataLoader라는 클래스를 정의하여 SQuAD 데이터셋을 처리하고, 모델 학습 또는 추론을 위한 배치(batch)를 생성하는 과정을 담당합니다. 주요 목적은 데이터셋을 효율적으로 로드하고, 모델에 필요한 형식으로 변환하여 배치 형태로 제공하는 것입니다. 아래에 각 부분에 대한 설명을 추가합니다:
주요 목적
- 데이터셋 로딩 및 배치 생성:
- SquadDataset 객체로부터 데이터를 로드하고, 배치 크기 및 기타 설정에 따라 데이터를 배치 형태로 준비합니다.
- 학습 모드와 인퍼런스 모드에 따라 적절한 데이터를 반환합니다.
- 특성(collate) 함수 정의:
- 여러 개의 샘플(features)을 하나의 배치로 병합합니다.
- 모델 입력 형식에 맞게 데이터를 텐서로 변환합니다.
각 부분 설명
- 클래스 초기화:
- SquadDataLoader 클래스는 PyTorch의 DataLoader 클래스를 상속합니다.
- __init__ 메서드에서 데이터셋 객체, 배치 크기, 인퍼런스 여부, 셔플 여부 등을 인자로 받아 초기화합니다.
- collate_fn 인자로 squad_collate_fn 함수를 지정하여 배치를 생성할 때 해당 함수를 사용하도록 합니다.
- 특성(collate) 함수:
- squad_collate_fn 함수는 주어진 여러 샘플(features)을 하나의 배치로 병합하는 역할을 합니다.
- input_ids, input_mask, segment_ids, cls_index, p_mask 등 각 특성을 추출하여 텐서로 변환합니다.
- 인퍼런스 모드인 경우에는 example_index를 추가로 반환합니다.
- 학습 모드인 경우에는 start_positions, end_positions를 추가로 반환하여 총 7개의 텐서를 반환합니다.
요약
이 코드는 SQuAD 데이터셋을 처리하고 배치를 생성하는 과정에서, 학습 및 인퍼런스 목적에 따라 적절한 텐서 형식으로 데이터를 변환하여 모델에 입력할 수 있도록 준비하는 역할을 합니다. 이를 통해 모델 학습 및 평가 과정을 효율적으로 수행할 수 있습니다.
model = BertForQuestionAnswering.from_pretrained('bert-base-uncased').cuda()

model.train()


# train function: 모델을 학습시키는 함수 정의
def train(model, dataloader, optimizer):
    # tqdm을 사용하여 진행 상황을 표시합니다.
    tbar = tqdm(dataloader, desc='Training', leave=True)

    # 전체 손실을 저장할 변수 초기화
    total_loss = 0.0
    # DataLoader에서 배치를 하나씩 가져와서 학습을 진행합니다.
    for i, batch in enumerate(tbar):
        # 이전 단계의 기울기 값을 초기화합니다.
        optimizer.zero_grad()

        # cls_index와 p_mask는 XLNet 모델에 사용되므로 BERT에서는 사용하지 않는다.
        input_ids, input_mask, segment_ids, cls_index, p_mask, start_positions, end_positions = batch

        # to cuda (gpu 사용 시)
        input_ids = input_ids.cuda()
        input_mask = input_mask.cuda()
        segment_ids = segment_ids.cuda()
        start_positions = start_positions.cuda()
        end_positions = end_positions.cuda()

        # train model
        #out = model(input_ids=input_ids, attention_mask=attention_mask, labels=labels)
        # 모델에 입력값을 전달하고, 손실을 계산합니다.
        inputs = {
            'input_ids': input_ids,
            'token_type_ids': segment_ids,
            'attention_mask': input_mask,
        }
        out = model(**inputs, start_positions=start_positions, end_positions=end_positions)
        loss = out.loss

        # 역전파를 통해 기울기를 계산하고 옵티마이저를 사용하여 가중치를 업데이트합니다.
        loss.backward()
        optimizer.step()
        # 현재 배치의 손실 값을 전체 손실에 더합니다.
        total_loss += loss.data.item()
        # 평균 손실 값을 tqdm 설명에 업데이트합니다.
tbar.set_description("Average Loss = {:.4f})".format(total_loss/(i+1)))코드 설명
이 코드는 모델을 학습시키기 위한 train 함수를 정의하고 있습니다. 이 함수는 주어진 데이터로더와 옵티마이저를 사용하여 모델을 학습시키는 역할을 합니다. 주요 과정은 다음과 같습니다:
- tqdm 사용:
- tqdm은 Python에서 루프의 진행 상황을 시각적으로 표시하는 라이브러리입니다. 진행률을 보여줌으로써 현재 학습이 얼마나 진행되었는지 알 수 있습니다.
- tqdm(dataloader, desc='Training', leave=True)를 사용하여 dataloader의 진행 상황을 'Training'이라는 설명과 함께 표시합니다.
- 손실 초기화:
- total_loss 변수를 초기화하여 전체 손실을 누적합니다.
- 루프를 통해 배치 처리:
- for i, batch in enumerate(tbar) 루프를 통해 데이터로더에서 배치를 하나씩 가져와 처리합니다.
- optimizer.zero_grad()를 호출하여 이전 단계의 기울기 값을 초기화합니다.
- 입력 데이터 준비:
- 배치에서 input_ids, input_mask, segment_ids, cls_index, p_mask, start_positions, end_positions를 추출합니다.
- cls_index와 p_mask는 XLNet 모델에 사용되는 것이므로 BERT에서는 사용되지 않습니다.
- CUDA(GPU)를 사용하는 경우, 데이터를 CUDA 장치로 이동시킵니다.
- 모델 학습:
- 입력값을 모델에 전달하여 예측값을 계산하고 손실을 반환받습니다.
- inputs 딕셔너리를 사용하여 모델에 필요한 입력값을 전달합니다.
- out = model(**inputs, start_positions=start_positions, end_positions=end_positions)를 통해 모델의 출력을 얻고 손실을 계산합니다.
- 역전파 및 옵티마이저 스텝:
- loss.backward()를 호출하여 역전파를 통해 기울기를 계산합니다.
- optimizer.step()을 호출하여 옵티마이저가 모델의 가중치를 업데이트합니다.
- 손실 누적 및 표시:
- 현재 배치의 손실 값을 total_loss에 더합니다.
- tbar.set_description("Average Loss = {:.4f})".format(total_loss/(i+1)))를 사용하여 tqdm의 설명을 업데이트하고 평균 손실 값을 표시합니다.
tqdm에 대한 설명
tqdm은 루프의 진행 상황을 시각적으로 표시해주는 Python 라이브러리입니다. 학습이나 데이터 처리 과정에서 진행 상황을 쉽게 파악할 수 있도록 도와줍니다. tqdm을 사용하면 현재 진행률, 남은 시간, 처리 속도 등의 정보를 한눈에 볼 수 있습니다.
"""
Train (Fine-tune) your BERT with SQuAD dataset
"""

# 옵티마이저 설정: AdamW 옵티마이저를 사용하고, 학습률(lr)과 epsilon(eps)을 설정합니다.
optimizer = AdamW(model.parameters(), lr = 2e-5, eps = 1e-8)
# 손실 함수 설정: 교차 엔트로피 손실 함수 사용
loss = nn.CrossEntropyLoss()
# 에포크 수 설정: 10 에포크 동안 학습
n_epoch = 1

# actual training
for i in range(n_epoch):
    # 학습 함수 호출: 모델, 데이터로더, 옵티마이저를 전달하여 학습을 진행합니다.
    train(model, train_dataloader, optimizer)
    torch.save(model.state_dict(), 'squad_model.bin')

# save model
torch.save(model.state_dict(), 'squad_model.bin')
학습하는데 시간이..........
평가 코드 만드는데 시간이 좀 걸렸네요....
웹사이트 코드가 뭔가 이상한거 같아서...ㅠ
print("Dataset Loading")
valid_dataset = SquadDataset(path, tokenizer, is_train=False, is_inference=True)

print("Data Loader")
valid_dataloader = SquadDataLoader(valid_dataset, batch_size=16, is_inference=True, shuffle=False)
데이터 읽어옵니다.
# 토큰 ID를 단어로 변환하는 함수

def decode_tokens(tokenizer, input_ids, start_index, end_index):
    tokens = input_ids[start_index:end_index+1]
    tokens = tokenizer.convert_ids_to_tokens(tokens,skip_special_tokens=True)
    # 서브워드 토큰을 원래 단어로 합치기
    decoded_tokens = tokenizer.convert_tokens_to_string(tokens)
    return decoded_tokens

def inference(model, tokenizer):
    model.eval()
    tbar = tqdm(valid_dataloader, desc='inference', leave=True)
    all_results = []
    unique_id = 0
    for i, batch in enumerate(tbar):
        model.eval()
        input_ids, input_mask, segment_ids,cls_index,p_mask, example_indices = batch
        input_ids = input_ids.cuda()
        input_mask = input_mask.cuda()
        segment_ids = segment_ids.cuda()
        inputs = {'input_ids': input_ids,
                  #'token_type_ids': segment_ids,
                  'attention_mask': input_mask}
        with torch.no_grad():
            out = model(**inputs)
        for j, example_index in enumerate(example_indices):
            start_logits = out[0][j]
            end_logits = out[1][j]
            start_index = torch.argmax(start_logits).item()
            end_index = torch.argmax(end_logits).item()
            prediction = decode_tokens(tokenizer, input_ids[j].cpu().numpy(), start_index, end_index)
            all_results.append(prediction)

    return all_results
answer = inference(model, tokenizer)
예측한 시작과 끝 인덱스를 토큰 -> 단어로 벼노한하여 결과로 저장합니다.
저기 segment_ids가 주석처리 된 이유는 'deepset/roberta-base-squad2'는 저게 필요 없기 때문
import torch
import numpy as np
from tqdm import tqdm
from sklearn.metrics import f1_score
from collections import Counter
import re


with open("/kaggle/input/2024-1-nlp-4/dev-v2.json", "r") as f:
    dt = json.load(f)["data"]

def get_answers(dataset):
    answers = []
    questions = []
    for article in dataset:
        for paragraph in article["paragraphs"]:
            for qa in paragraph["qas"]:
                if qa["answers"]:  # 리스트가 비어 있지 않은 경우에만 추가
                    questions.append(qa['question'])
                    answers.append(qa["answers"][0]["text"])
    return answers,questions

ground_truths,questions = get_answers(dt)


# 문제와 정답, 예측 결과 출력
num_examples_to_show = min(100, len(answer))
for i in range(num_examples_to_show):
    print(f"문제 {questions[i]}:")
    print(f"정답: {ground_truths[i]}")
    print(f"예측: {answer[i]}")
    print()
전에 바꾼 것을 토대로 특수문자, 띄어쓰기, 대문자 -> 소문자로 변경하여 f1 score를 만듭니다.
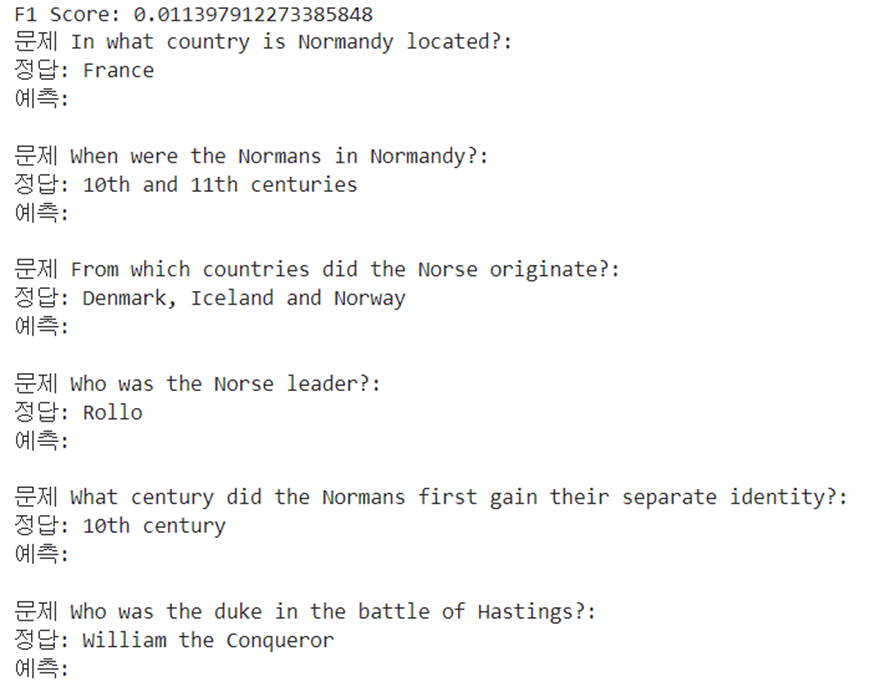
학습 못한 데이터에 대해서는 출력을 하나도 못하네요...
학습하면 예측 좀 합니다.
import string
import re
import collections


def normalize_answer(s):
    def remove_articles(text):
        regex = re.compile(r'\b(a|an|the)\b', re.UNICODE)
        return re.sub(regex, ' ', text)
    def white_space_fix(text):
        return ' '.join(text.split())
    def remove_punc(text):
        exclude = set(string.punctuation)
        return ''.join(ch for ch in text if ch not in exclude)
    def lower(text):
        return text.lower()
    return white_space_fix(remove_articles(remove_punc(lower(s))))

with open("/kaggle/input/2024-1-nlp-4/dev-v2.json", "r") as f:
    dt = json.load(f)["data"]

def compute_exact(a_gold, a_pred):
    return int(normalize_answer(a_gold) == normalize_answer(a_pred))

def compute_f1(a_gold, a_pred):
    gold_toks = get_tokens(a_gold)
    pred_toks = get_tokens(a_pred)
    common = collections.Counter(gold_toks) & collections.Counter(pred_toks)
    num_same = sum(common.values())
    if len(gold_toks) == 0 or len(pred_toks) == 0:
    # If either is no-answer, then F1 is 1 if they agree, 0 otherwise
        return int(gold_toks == pred_toks)
    if num_same == 0:
        return 0
    precision = 1.0 * num_same / len(pred_toks)
    recall = 1.0 * num_same / len(gold_toks)
    f1 = (2 * precision * recall) / (precision + recall)
    return f1

def get_tokens(s):
    if not s: return []
    return normalize_answer(s).split()

def get_raw_scores(dataset,pred):

    exsc = 0
    f1sc = 0
    num = 0
    for article in dataset:
        for paragraph in article["paragraphs"]:
            for qa in paragraph["qas"]:
                gold_answers = [a['text'] for a in qa['answers']
                        if normalize_answer(a['text'])]

                if not gold_answers:
          # For unanswerable questions, only correct answer is empty string
                    gold_answers = ['']
                a_pred = pred[num]

                exsc = exsc + max(compute_exact(a, a_pred) for a in gold_answers)
                f1sc = f1sc + max(compute_f1(a, a_pred) for a in gold_answers)
                num = num +1
    return exsc,f1sc


exact_raw, f1_raw = get_raw_scores(dt, answer)

print("exact, fq",exact_raw/11873,f1_raw/11873 )'인공지능 > 자연어 처리' 카테고리의 다른 글
| 자연어 처리 11강 - Named Entity Recognition (NER) + BERT (2) | 2024.06.03 |
|---|---|
| 자연어 처리 10강 - Language Modeling with GPT (0) | 2024.06.03 |
| 한->영 번역기 만들기 python 실습 - seq2seq, LSTM, GRU, BLEU score (0) | 2024.05.05 |
| seq2seq 번역 모델 만들기 (0) | 2024.05.03 |
| 자연어 처리 python 양방향(Bidirectional) LSTM 진행하기 (0) | 2024.04.28 |