한국어 자연어 추론 Task 실습
Introduction
Chapter 7. 자연어 이해(NLU) Task 강의의 한국어 자연어 추론 Task 실습 강의입니다.
이번 실습에서는 (1) SKTBrain이 공개한 KoBERT를 KLUE 벤치마크 데이터셋의 KLUE-NLI 데이터셋으로 파인튜닝하고, (2) 파인튜닝한 모델의 자연어 추론 작업에 대한 성능과 결과를 분석해보겠습니다.
자연어 추론(NLI) 작업의 목표는 가설 문장과 전제 문장 간의 관계를 추론하는 것입니다.
전제가 주어지면 NLI 모델은 가설이 참(entailment), 거짓(contradiction) 또는 미결정(neutral)인지 결정합니다. 이 작업은 RTE(Recognizing Textual Entailment)라고도 합니다.
!pip install git+https://git@github.com/SKTBrain/KoBERT.git@master1. KoBERT 모델 불러오기
오늘 실습에는 SKTBrain에서 공개한 KoBERT-Transformers 모델을 사용합니다!
KoBERT 모델은 SKTBrain에서 공개한 한국어 데이터로 사전학습한 BERT 모델로,
google의 multi-lingual BERT 성능의 한계를 극복하기 위해 공개되었습니다.
KoBERT-Transformers 모델은 KoBERT를 Huggingface.co 기반으로 사용할 수 있게 Wrapping 작업을 진행한 모델입니다.
KoBERT : https://github.com/SKTBrain/KoBERT
KoBERT-Transformers: https://github.com/monologg/KoBERT-Transformers
from kobert import get_tokenizer
from kobert import get_pytorch_kobert_model
이번 실습에서는 GluonNLP라는 툴킷을 사용하여 코드를 간단하게 구성해볼건데요,
GluonNLP는 자연어처리(NLP)의 연구 속도를 높이는데 도움이 되는 자연어 전처리 및 데이터셋 로드 과정을 추상화해주는 툴킷입니다.
다음의 링크에서 GluonNLP의 quick start guide 혹은 glounnlp.data의 사용 예제를 확인해보셔도 좋을 것 같습니다!
import gluonnlp as nlp

bert_model, vocab = get_pytorch_kobert_model(cachedir=".cache")# 모델과 보캡을 받아온다.

tokenizer = get_tokenizer() # 토크나이저도 받아온다.
bert_tokenizer = nlp.data.BERTSPTokenizer(tokenizer, vocab, lower=False)
2. 데이터셋 로드하기
본 실습에서는 KLUE 벤치마크 데이터셋 중 하나인 KLUE-NLI 데이터셋을 사용하여, 자연어 추론 실습을 진행합니다.
해당 데이터셋에 대한 라이센스는 여기서 확인할 수 있습니다.
NLI 데이터셋은 GLUE 및 superGLUE와 같은 다양한 NLU 벤치마크에도 포함되어 있으며 다른 NLU 작업을 위한 학습 데이터로 사용할 수 있습니다!
2.1. 데이터셋 특징
본 데이터셋은 NLI 모델이 전제(premise) 및 가설(hypothesis) 문장의 각 쌍을 읽고 관계가 entailment(true, 1), contradiction(false, 0) 또는 neutral인지 예측하는 문장 쌍 분류 작업으로 NLI를 공식화합니다. 3개의 레이블을 classification한다.
따라서, 본 데이터셋을 사용하는 자연어 추론 작업에서는 분류 정확도를 사용하여 모델 성능을 측정합니다.
본 데이터셋은 전제(premise) 데이터 수집을 위해 WIKITREE, 정책, WIKINEWS, KIKIPDEIA, NSMC 및 AIRBNB의 6개 말뭉치를 사용합니다.
따라서, KLUE-NLI 데이터셋은 현대 한국어의 다양한 주제와 문체를 다루고 있습니다. 데이터의 다양성을 확보했다.
전제(premise) 문장 수집
WIKITREE, 정책 및 WIKINEWS는 뉴스 기사이고 WIKIPEDIA는 백과사전입니다. NSMC와 AIRBNB는 각각 영화와 여행에 대한 구어체 리뷰로 구성되어 있습니다.
형식 문장은 일반적으로 구어체 문장보다 어렵기 때문에 구어체 말뭉치에서 약간 더 많은 문장을 추출하여 전제(premise) 문장의 난이도를 균형 있게 조정합니다.
가설(hypothesis) 문장 수집
총 6개의 말뭉치에서 가설(hypothesis)을 도출할 수 있는 10,000개의 전제(premise)를 추출합니다.
추출 조건은 다음과 같음
- 전제는 명제입니다. 명제는 진리 값(즉, 참 또는 거짓)을 할당할 수 있는 선언문이어야 함 (다만, 수학공식, 목록 등 일부 명제는 제외됨)
- 전제는 적어도 하나의 술어를 포함해야 함. 예를 들어, states(예: be, believe, know), activities(예: play, smile, walk), achievements(예: realize, reach, break) 및 accomplishments(예: eat, build, paint)와 같은 다양한 술어가 허용
- 전제의 길이는 공백을 포함하여 20자에서 90자 사이여야 합니다.
전체 데이터셋 통계

대략 31000개의 데이터가 있다.
2.2. 데이터셋 로드
KLUE 벤치마크 데이터셋과 KLUE-NLI 데이터셋은 다음의 위치에서 다운로드할 수 있습니다.
import json

!wget -O ./raw_train_dataset.json https://raw.githubusercontent.com/KLUE-benchmark/KLUE/main/klue_benchmark/klue-nli-v1.1/klue-nli-v1.1_train.json
!wget -O ./raw_test_dataset.json https://raw.githubusercontent.com/KLUE-benchmark/KLUE/main/klue_benchmark/klue-nli-v1.1/klue-nli-v1.1_dev.json
# 데이터 셋을 받아온다.

def tranform_to_dataset(file_path):
  dataset = []
  with open(file_path, "r") as f:
    raw_data = json.load(f)
    for data in raw_data:
      dataset.append([
          data["premise"],
          data["hypothesis"],
          data["gold_label"]
      ])
  return dataset

raw_train_dataset = tranform_to_dataset("raw_train_dataset.json")
raw_test_dataset = tranform_to_dataset("raw_test_dataset.json")

print('Length of Train : ',len(raw_train_dataset))#24998
print('Length of Test : ',len(raw_test_dataset))#3000

raw_test_dataset[20]
['16일 독일 베를린에서 열린 제26회 세계남자핸드볼선수권대회에서 남북 단일팀과 세르비아의 경기가 열렸다.',
'제26회 세계 남자 핸드볼 선수권 대회에 남과 북은 모두 출전하지 않았다.',
'contradiction']
2.3. 데이터셋 클래스 선언
문장 두 개가 주어졌을 때 입력 형식을 나눠줘야 한다.
import torch
from torch import nn
import torch.nn.functional as F
import numpy as np
from torch.utils.data import Dataset, DataLoader
먼저 데이터셋의 input 형식을 결정해줍니다
NLI 작업이므로, 데이터셋의 입력이 다음과 같길 원합니다.
[CLS] + premise + [SEP] + hypothesis + [SEP]
# Fair를 활용한 tokenizing
premise_sample = raw_train_dataset[0][0]
hypothesis_sample = raw_train_dataset[0][1]

print(f"{premise_sample}")
print(f"{hypothesis_sample}")
힛걸 진심 최고다 그 어떤 히어로보다 멋지다
힛걸 진심 최고로 멋지다.
다음과 같이 pair=True로 설정해주면, [SEP] 토큰이 자동으로 붙음!
transform = nlp.data.BERTSentenceTransform(bert_tokenizer, max_seq_length = 64, pad = True, pair = True)
transform([premise_sample, hypothesis_sample])
(array([ 2, 517, 0, 5390, 4360, 6745, 4522, 5782, 1185, 3224, 517,
7996, 6855, 6079, 6371, 517, 6188, 7318, 5782, 3, 517, 0,
5390, 4360, 6745, 4522, 6079, 517, 6188, 7318, 5782, 517, 54,
3, 1, 1, 1, 1, 1, 1, 1, 1, 1, 1,
1, 1, 1, 1, 1, 1, 1, 1, 1, 1, 1,
1, 1, 1, 1, 1, 1, 1, 1, 1], dtype=int32),
array(34, dtype=int32),
array([0, 0, 0, 0, 0, 0, 0, 0, 0, 0, 0, 0, 0, 0, 0, 0, 0, 0, 0, 0, 1, 1,
1, 1, 1, 1, 1, 1, 1, 1, 1, 1, 1, 1, 0, 0, 0, 0, 0, 0, 0, 0, 0, 0,
0, 0, 0, 0, 0, 0, 0, 0, 0, 0, 0, 0, 0, 0, 0, 0, 0, 0, 0, 0],
dtype=int32))
위 입력에 따라 BERT 모델에서 사용할 데이터셋의 클래스를 정의합니다
label_dict = {
  "entailment": 0,
  "contradiction": 1,
  "neutral": 2
}

class BERTDataset(Dataset):
    def __init__(self, dataset, premise_idx, hypo_idx, label_idx, bert_tokenizer, max_len, pad, pair, mode = "train"):
        self.mode = mode
        transform = nlp.data.BERTSentenceTransform(bert_tokenizer, max_seq_length = max_len, pad = pad, pair = pair)

        if self.mode == "train":
            self.sentence = [transform([i[premise_idx], i[hypo_idx]]) for i in dataset] # BERT에 넣을 것 처럼 정의해준다.
            self.labels = [np.int32(label_dict[i[label_idx]]) for i in dataset] # 키 값을 넣어 숫자 형으로 변환한다.

        else:
            self.sentence =  [transform([i[premise_idx], i[hypo_idx]]) for i in dataset]

    def __getitem__(self, i):
        if self.mode == 'train':
            return (self.sentence[i] +  (self.labels[i], ))
        else:
            return self.sentence[i]

    def __len__(self):
        return (len(self.sentence))
입력 형식을 확인했으니, 데이터셋 클래스를 선언합니다.
max_len = 64
batch_size = 64

train_dataset = BERTDataset(raw_train_dataset[:int(len(raw_train_dataset) * 0.9)], 0, 1, 2, bert_tokenizer, max_len, True, True, mode = "train")
valid_dataset = BERTDataset(raw_train_dataset[int(len(raw_train_dataset) * 0.9):], 0, 1, 2, bert_tokenizer, max_len, True, True, mode = "train")

test_dataset = BERTDataset(raw_test_dataset, 0, 1, 2, bert_tokenizer, max_len, True, True, mode = "train")

print(f"학습 데이터셋 개수: {len(train_dataset)}")# 22498
print(f"검증 데이터셋 개수: {len(valid_dataset)}") #2500
print(f"테스트 데이터셋 개수: {len(test_dataset)}") #3000

test_dataset[0] #토큰화가 잘 되었는지 확인 가능하다.

train_dataloader = DataLoader(train_dataset, batch_size = batch_size, num_workers = 5)
valid_dataloader = DataLoader(valid_dataset, batch_size = batch_size, num_workers = 5)
test_dataloader = DataLoader(test_dataset, batch_size = batch_size, num_workers = 5)
3. BERT with classifier 모델 클래스 정의
KLUE의 NLI 데이터셋은 entailment, contradiction, neutral을 분류해야하는 작업이므로,
입력 리뷰 데이터에 대해 multi-class 레이블을 예측할 수 있어야 합니다.
따라서, 출력 차원이 3인 classifier를 BERT 모델에 추가해줘야 합니다!
dropout_rate = 0.2

class BERTClassifier(nn.Module):
  def __init__(
    self,
    bert,
    hidden_size = 768, # 디멘젼 차원 보통 768차원을 많이 쓴다.
    num_classes=3,
    dropout=None,
    params=None
  ):
    super(BERTClassifier, self).__init__()
    self.bert = bert
    self.dropout = dropout

    # classification 작업을 수행하기 위해 output을 num_classes로 projection하는 레이어를 추가합니다.
    self.classifier = nn.Linear(hidden_size, num_classes) # 분류 해야 할 레이블 만큼

    if dropout:
      self.dropout = nn.Dropout(p=dropout)

  def gen_attention_mask(self, token_ids, valid_length): # 어텐션 마스크 형성
    attention_mask = torch.zeros_like(token_ids)
    for i, v in enumerate(valid_length):
      attention_mask[i][:v] = 1
    return attention_mask.float()

  def forward(self, token_ids, valid_length, segment_ids):
    attention_mask = self.gen_attention_mask(token_ids, valid_length)

    # BERT 모델에서 나온 출력의 CLS 토큰을 반환합니다
    _, pooler = self.bert(input_ids = token_ids, token_type_ids = segment_ids.long(), attention_mask = attention_mask.float().to(token_ids.device)) # 기본적으로 정의 되어 있다.

    if self.dropout:
      output = self.dropout(pooler)
    else:
      output = pooler

    predicted = self.classifier(output)

    return predicted

# GPU

device = torch.device("cuda:0")

model = BERTClassifier(bert_model, dropout=dropout_rate).to(device)
4. 학습 파라미터 설정
from transformers import AdamW
from transformers.optimization import get_cosine_schedule_with_warmup
import torch.optim as optim
from tqdm.notebook import tqdm
안정적인 학습을 위해 다음과 같이 학습 파라미터를 설정합니다.
warmup_ratio = 0.1
num_epochs = 1 # 오래걸린다!
max_grad_norm = 1
learning_rate =  5e-5
설정된 파라미터에 따라 weight decay 및 optimizer를 정의합니다.
# Prepare optimizer and schedule (linear warmup and decay)
no_decay = ['bias', 'LayerNorm.weight']
optimizer_grouped_parameters = [
    {'params': [p for n, p in model.named_parameters() if not any(nd in n for nd in no_decay)], 'weight_decay': 0.01},
    {'params': [p for n, p in model.named_parameters() if any(nd in n for nd in no_decay)], 'weight_decay': 0.0}
]

optimizer = AdamW(optimizer_grouped_parameters, lr=learning_rate)
loss_fn = nn.CrossEntropyLoss()

total_steps = len(train_dataloader) * num_epochs
warmup_step = int(total_steps * warmup_ratio)

print(f"전체 학습 스텝은 다음과 같습니다: {total_steps}")
print(f"전체 학습 스텝 중 warmup 스텝은 다음과 같습니다: {warmup_step}")
print(f"전체 학습 스텝은 다음과 같습니다: {total_steps}")
print(f"전체 학습 스텝 중 warmup 스텝은 다음과 같습니다: {warmup_step}")
설정된 파라미터에 따라 learning rate scheduler를 설정합니다.
scheduler = get_cosine_schedule_with_warmup(optimizer, num_warmup_steps=warmup_step, num_training_steps=total_steps)5. 모델 학습 및 분석
본 학습에서는 다음과 같이 정확도로 모델의 성능을 평가합니다.
def calc_accuracy(X,Y):
max_vals, max_indices = torch.max(X, 1)
train_acc = (max_indices == Y).sum().data.cpu().numpy()/max_indices.size()[0]
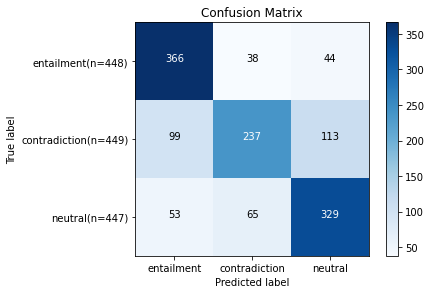
return train_acc추가로, 테스트 데이터셋에 대한 confusion matrix를 출력하기 위해 다음과 같은 함수를 정의합니다.
import matplotlib.pyplot as plt
import itertools

from sklearn.metrics import confusion_matrix

def plot_confusion_matrix(c_matrix, labels, title='Confusion Matrix', cmap=plt.cm.get_cmap('Blues')):
    plt.imshow(c_matrix, interpolation='nearest', cmap=cmap)
    plt.title(title)
    plt.colorbar()
    marks = np.arange(len(labels))
    nlabels = []

    for k in range(len(c_matrix)):
        n = sum(c_matrix[k])
        nlabel = '{0}(n={1})'.format(labels[k],n)
        nlabels.append(nlabel)

    plt.xticks(marks, labels)
    plt.yticks(marks, nlabels)

    thresh = c_matrix.max() / 2.

    for i, j in itertools.product(range(c_matrix.shape[0]), range(c_matrix.shape[1])):
      plt.text(j, i, c_matrix[i, j], horizontalalignment="center", color="white" if c_matrix[i, j] > thresh else "black")

    plt.tight_layout()
    plt.ylabel('True label')
    plt.xlabel('Predicted label')
    plt.show()
다음과 같이 모델 학습 코드를 작성합니다!
log_interval = 200
for e in range(num_epochs):
    train_acc = 0.0
    test_acc = 0.0

    model.train()

    for batch_id, (token_ids, seq_length, segment_ids, label) in tqdm(enumerate(train_dataloader), total=len(train_dataloader)): # 진척도가 표시된다.
      optimizer.zero_grad()

      token_ids = token_ids.long().to(device)
      segment_ids = segment_ids.long().to(device)
      label = label.long().to(device)

      predict = model(token_ids, seq_length, segment_ids)
      loss = loss_fn(predict, label)
      loss.backward()

      torch.nn.utils.clip_grad_norm_(model.parameters(), max_grad_norm)# 그래디언트가 너무 크지 않도록

      # optimizer와 scheduler를 스텝에 따라 업데이트합니다.
      optimizer.step()
      scheduler.step() # lr 조정

      train_acc += calc_accuracy(predict, label)

      if batch_id % log_interval == 0:
        print("epoch {} batch id {} loss {} train acc {}".format(
          e+1, batch_id+1,
          loss.data.cpu().numpy(),
          train_acc / (batch_id+1)
          )# validation을 메 스탭마다 하면 오래걸리므로 특정 시점에서만 한다.
        )

      if batch_id == log_interval:
        # 빠른 실습을 위해 200 step만 학습
        break

    print("epoch {} train acc {}".format(e+1, train_acc / (batch_id+1)))

    # 한 에폭의 학습이 종료된 후, 테스트 데이터셋에 대한 성능을 출력합니다.
    model.eval()

    total_label = []
    total_predict = []

    for batch_id, (token_ids, seq_length, segment_ids, label) in tqdm(enumerate(test_dataloader), total=len(test_dataloader)):
        token_ids = token_ids.long().to(device)
        segment_ids = segment_ids.long().to(device)
        label = label.long().to(device)

        predict = model(token_ids, seq_length, segment_ids)
        test_acc += calc_accuracy(predict, label)

        predicted_label = torch.max(predict, 1)[1]

        total_label += label.tolist()
        total_predict += predicted_label.tolist()

        # 빠른 실습을 위해 20 step만 평가
        if batch_id == 20:
          break

    # 테스트가 종료된 후, 테스트 데이터셋 전체 성능을 요약하여 출력
    print("epoch {} test acc {}".format(e+1, test_acc / (batch_id+1)))

    # 테스트가 종료된 후, 테스트 데이터셋 전체 예측값에 대한 confusion matrix 출력
    test_confusion_matrix = confusion_matrix(total_label, total_predict)
    plot_confusion_matrix(test_confusion_matrix, labels=["entailment", "contradiction", "neutral"])
사전 학습 된 모델이므로 처음에도 loss가 그렇게 크지 않다.
6. 모델 직접 추론하기
레이블 없는 실 사용이다.
def inference_model(model, bert_tokenizer, max_len, premise, hypothesis):
  transform = nlp.data.BERTSentenceTransform(bert_tokenizer, max_seq_length = max_len, pad = True, pair = True)
  token_ids, seq_length, segment_ids = transform([premise, hypothesis])

  model.eval()

  with torch.no_grad():
    predict = model(
        torch.tensor([token_ids]).long().to(device),
        torch.tensor([int(seq_length)]).long().to(device),
        torch.tensor([segment_ids]).long().to(device)
      )

  return int(torch.argmax(predict)) # 가장 높은 차원 반환

# Fair를 활용한 tokenizing
premise_sample = raw_test_dataset[5][0]
hypothesis_sample = raw_test_dataset[5][1]

print(f"{premise_sample}")
print(f"{hypothesis_sample}")
10층에 건물사람들만 이용하는 수영장과 썬베드들이 있구요.
수영장과 썬베드는 9층에 있습니다.
틀렸다.
label = {
  "entailment": 0,
  "contradiction": 1,
  "neutral": 2,
}

inference_model(model, bert_tokenizer, 64, premise_sample, hypothesis_sample) # 1로 잘 나온다.

# Fair를 활용한 tokenizing
premise_sample = raw_test_dataset[10][0]
hypothesis_sample = raw_test_dataset[10][1]

print(f"{premise_sample}")
print(f"{hypothesis_sample}")

inference_model(model, bert_tokenizer, 64, premise_sample, hypothesis_sample)'인공지능 > 자연어 처리' 카테고리의 다른 글
| 자연어 처리 정리 - 2강 Text mining (0) | 2024.04.12 |
|---|---|
| 자연어 처리 Python 실습 - 한국어 관계 추출 (0) | 2024.04.11 |
| 자연어 이해 NLU - Relation Extraction Task 관계 추출 (0) | 2024.04.11 |
| 자연어 처리 온라인 강의 - Machine Translation with RNN (0) | 2024.04.10 |
| 자연어 처리 과제 2 - CNN text classification 감성 분석 (0) | 2024.04.10 |